
I wasn't planning on doing a makeup 101 on a look I did on myself, but a friend of mine requested I post one so this one's for you Michelle (she's competing for Miss Universe Canada so be sure to vote here)!

Photo Credit: Myself
This is my "professional" head shot. I realized all of the photos I have of myself were all self-shots - kind of pathetic I know but we all do it! Plus, I hate taking photos by myself. I was asked by someone in the media to submit my photo to include in an article and thought it would be completely embarrassing to use a distorted self-shot. To save some money, I took it into my own hands and organized a mini photo shoot for myself. Thanks to my husband's Canon SLR, tripod, reflector, flash, my Zuca to sit on and a handy wireless trigger I was able to pull off this photo. It took many shots, expressions and lighting variations to get it just right.
When deciding on the look, I wasn't sure if I should go with my favourite bold lip or a smoky eye. When I thought about how I wanted people to perceive me I wanted the look to be approachable, professional and demonstrate who I am as an artist. I also wanted my makeup to translate well in a black & white photo.
Here is a breakdown of the products and how I achieved this look. This is definitely wearable for day and night. If you want to go a little more dramatic add your favourite bold lippy.
Skin:
- Consonant Ultra Moisturizing Organic Face Cream (sample - review soon)
- Consonant Ultra Firming Organic Eye Cream (sample - review soon)
- Korres Vitamin E Silicone-Free Primer (my face was hyper sensitive that day from a concealer I had tested out the day before)
- Face Atelier Ultra Foundation Pro #7
- Benefit Erase Paste Concealer (under eyes)
- Smashbox Hydrating Halo Powder
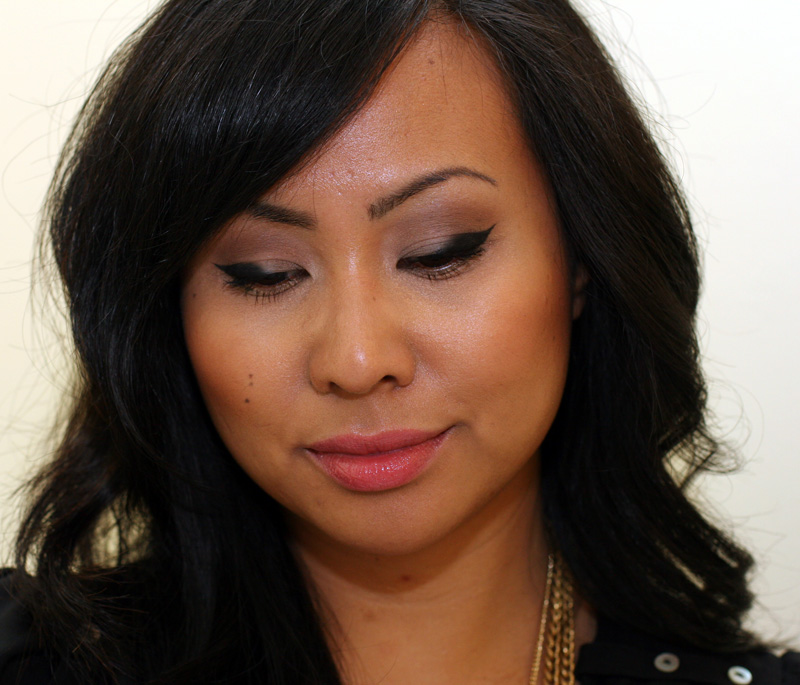
Eyes: I lose a lot of my lid when I open my eyes so I wanted something that would stand out but not be overly dramatic. Instead of going smoky, I exaggerated my liquid liner a little thicker than usual and started the line in the middle winging it out and up.
- Too Faced Shadow Insurance (love the squeeze tube and it's just as good as UDPP)
- Base: matte neutral beige from the Tarte Jewelry Box palette
- Crease: matte light grey and a matte taupe grey over top, both from the Tarte Jewelry Box palette
- Hourglass Calligraphy Liquid Eye Liner - I brought the line up to where my crease folds then filled the line in. I blended the matte neutral beige slightly over the liner at the middle of the lid. When I have my eyes open, it looks like the regular winged eye liner, but when I close my eyes or look down the shape of the liner adds an unexpected twist on the classic winged liner look.
- CoverGirl Original Waterproof LashBlast mascara in Very Black
- Brows: the soft black matte shadow from the Tarte Jewelry Box palette
- Bailey Cosmetics Foundation Duo in Dark as my contour
- Smashbox Halo Bronzing Powder in the hallows
- NARS Douceur Blush higher on the cheekbones for a slimmer effect - I have round cheeks :)
- DaLish Cosmetics Cheek and Lip Balm in Pearl Luster - highlight along the cheekbones (review soon)
- Consonant Ultra Moisturizing Lip Conditioner (review soon)
- Benefit Lip Plump - I started using this again and remembered why I loved this product so much in the past. It's a great lip primer and fills in fine lines and accentuates the contour of your lips. If your lips naturally have a lot of colour, this is awesome to use as it creates a nude canvas so the true colour of your lip product will come through. It also helps your lip product stay on longer especially if you're wearing a gloss. You only need three little dots to spread all over the lips. Make sure you let the plumper dry before applying your lip colour. This is a better option than using concealer or foundation to cancel out your lips.
- Lip Colour: mark. Gloss Gorgeous Stay On Lip Stain in Bare - I am so in LOVE with these gloss stains from mark.! I will have to do a full review soon. I love stains but as the weather gets drier and colder, my lips need more moisture. This is the perfect combo between stain and gloss. My lips that day were actually really chapped and I found this gloss stain did not accentuate it at all. And it's one of the most inexpensive lip products I've purchased!
For my hair, I actually blow dried (which I rarely do) and round brushed it for some volume then did a few brush curls. I defined a few pieces by taking sections and wrapping it around a curling iron for a nice wave. I sprayed Schwartzkopf Glamour Queen volumizing spray at the root then sprayed all over for a light hold. I wanted it to look polished but not too perfect.
The overall look was clean, flawless and classic and totally conveys how I do makeup on all my clients. What do you think of the look? Do you do your makeup to show your personality?
11 comments:
So pretty Joy! Thanks for the break down of all the products and all your techniques. Have you ever thought about doing video?
I'm totally loving that you used the Mark lip stain! I got a brighter colour and used it after getting back from vacation - which was probably a big mistake in the first place as my skin (including lips) were getting all dry and patchy after coming home to such dry weather. I will have to try it out again once my skin settles down.
@Elaine - Thank you! Doing video could be a possibility in the near future ;)
Oh no - do you find the gloss gorgeous makes your lips feel drier since you've gotten back? I have really dry lips and haven't experienced drier lips with the gloss gorgeous. I have all 4 and love all the shades!
*whistles* What a hottie! ;)
Whoa I love how you winged your eyeliner. I'm totally going to try that next time. Thanks for the breakdown!
you look super gorgeous ms. joy ...
:)
I do my liner like this as well :)
Gorgeous pic Joy!
@Arianne - LOL thank u! U should totally try it - would look amazing on u!
@Stephanie - *blush* I try!
@Jennifer - nice! love doing the liner like this - so fun! and thanks!
Joy, you are beautiful... on the inside and out! Thank you for the breakdown... and the shout out on your post. You are so kind! xo
Michelle Kwan
Hey I love your look its super cute! I sell mark. & I wanted to extend a special discount to you & 15% off for your followers!
Please check out my online store
or msg me if you have any questions! And I would love to see more mark. reviews!
You look awesome and thanks for the make-up tips. I'll be sure to try some of your looks.
Tammy From Chickadvisor.com
Post a Comment