
Sculpting and shaping the contours of the face was a technique that was only done for television or print work, but now it is the latest trend in enhancing your natural beauty. There are so many contouring and highlighting products available now in sheer textures that anyone can disguise prominent features on the face and still look natural. For instance, the illusion of a slimmer face or higher cheekbones can all be achieved with the right products and tools.
My model for this look is my gorgeous best friend, Christine, who needed her makeup done for her optician badge. She wanted to stand out in her picture without adding a lot of makeup on since it is for professional use. I decided to go neutral on the eyes but enhance them with false lashes, a pop of colour on the cheeks and lips, and sculpt and highlight her best features. Alright, lets get started!
Tools:
M.A.C. #109 small contour brush, #190 foundation brush, #194 concealer brush, #129 powder/blush brush, #168 large angled contour brush, #217 blending brush, #219 pencil brush, #224 tapered blending brush, #239 eye shading brush
Face:
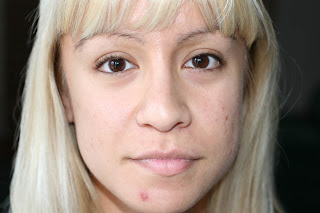
Christine willingly agreed to let me post a before picture of her. Thanks hun! Only a confident woman would let me do this! lol
Eyes:
My model for this look is my gorgeous best friend, Christine, who needed her makeup done for her optician badge. She wanted to stand out in her picture without adding a lot of makeup on since it is for professional use. I decided to go neutral on the eyes but enhance them with false lashes, a pop of colour on the cheeks and lips, and sculpt and highlight her best features. Alright, lets get started!
Tools:
M.A.C. #109 small contour brush, #190 foundation brush, #194 concealer brush, #129 powder/blush brush, #168 large angled contour brush, #217 blending brush, #219 pencil brush, #224 tapered blending brush, #239 eye shading brush

Face:
Christine willingly agreed to let me post a before picture of her. Thanks hun! Only a confident woman would let me do this! lol
- Prime: I primed her skin with M.A.C.'s Prep + Prime Face Protect SPF 50.
- Foundation: I evened out her skin tone with mark's Face Xpert Flawless Touch Makeup. It was a new product and she wanted me to try it on her. I used Honey because her body was darker than her face and I wanted to match it up. I was really impressed with the coverage - it's lightweight, medium to full coverage, oil-free, and has a nice creamy texture to it. It comes with a sponge-tip applicator which is okay for dabbing it on the skin but there's too much product on it to blend with. I used M.A.C.'s #190 brush to blend it out.
- Conceal: She had a few blemishes but I was able to quickly conceal them with my trusted Lise Watier Professional Corrector in Fair. I find applying concealer after foundation prevents you from piling on too much makeup. I used #194 to apply the concealer directly onto any raised blemishes. I blended out the edges with a sponge and applied loose powder over top so the concealer would not budge. I applied powder to the rest of her face to set her foundation.

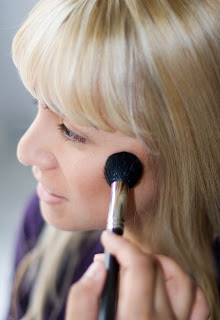
- Contour: Next, I decided to contour her face so you could see it against a natural face. I used #109 brush to apply the contour colour. There are many contour and highlighting palettes available which I will list later, but you can use a bronzer with no shimmer or a pressed powder 1 or 2 shades darker than your skin. Powder products are more forgiving than a darker foundation or concealer. I used Benefit's Hoola bronzer to contour her cheeks.
-
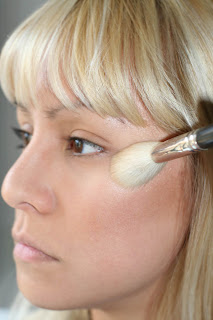
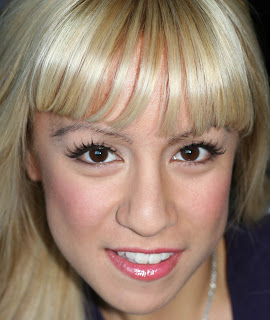
 I had her smile so I could see exactly where the colour should go. You want to apply most of the colour closer to the hairline and blend to the outer part of her cheek. I ran the #109 brush back and forth along the hollows of the cheek then used #129 brush to blend any harsh lines. The picture above is what it looks like blended. I also shaded the sides of her nose and outer jawline.


- Highlighting: This is an important element in creating dimensions to the face. I used the #168 brush to apply shimmer to the cheekbones, inner corner of eyes, brow bone, down the nose and above the bow of the lip. You can use a loose or pressed shimmer powder and depending on your skin tone in shades of white, champagne, or peachy-gold. I love to use M.A.C.'s Mineralize Skin Finish in Shimpagne (limited edition). It's a beautiful pearly champage shade and gives the skin a pretty glow.
- Blush: To give Christine a healthy pop of colour, I decided to use a true pink from Nars called Mata Hari. It looks bold in the compact but goes on the skin sheer so you can build to your desired intensity - a little goes a long way though. Tap of excess colour onto a kleenex or tapping the brush against your hand. I used #129 brush and applied the blush to the apples of the cheek. I used the same brush to blend the contour colour and blush together. Trend alert: pink cheeks will be making a come back come Spring!
- Brands that have special contour and highlight palettes: M.A.C. Sculpt and Shape Powder, Laura Geller Shade N' Sculpt Baked Contouring Powder with Brush, Stila Face Contouring Trio, and Make Up For Ever Compact Modellers
Eyes:

- Prime: I prepped her eyes with powder then applied M.A.C.'s Eye Paint in Untitled, with the #239 brush, as a base. There are many primers out there so use what you like best.
- Base Shadow: I dusted Nars' peachy shade from Key Largo on the lid with the #239 brush and highlighted the brow bone with M.A.C.'s Mineralize Skin Finish in Shimpagne using the #217 brush. I like using #217 under the brow bone because it applies shimmer to the brow bone naturally without looking too shiny and outdated.
- Colour: I love using bronzey-browns when doing a neutral eye. It gives the eye a bit of warmth and pairs well with different colours. I applied the bronzey hue from Nars' Key Largo Duo Shadow. I used #239 brush to apply the colour all across the lid and into the crease, concentrating the colour close to the lash line, using a patting motion. The colour will go on stronger using this technique. I used my #224 brush to blend any noticeable lines.
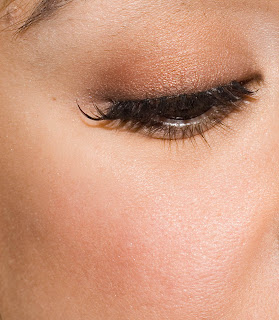
- Liner: Because I wanted this look to be fairly natural I didn't want a strong line. I was also applying fake lashes and didn't want to apply black liner to cover the lashes. I decided to smudge a deep chocolate shadow from Nars called Bengali, close to the lash line with M.A.C.'s #219 brush. I smudged some of the shadow into the outer crease for some dimension. I also smudged liner into her bottom lash line. If you look at the above picture the fake lash line is barely noticeable.
- Lashes: Christine loves fake lashes (who doesn't??) and wanted to bring out her eyes without heavy colour. Using fake lashes is a great way to add drama to the eye without looking over done. Her lashes were already curled and I decided to forgo the mascara because the faux lashes would be enough. I applied Quo's lashes that look exactly like M.A.C.'s #7 but are half the price. For steps on how to apply lashes refer to step #7 from a previous Makeup 101 by clicking here. I didn't need to blend her natural lash with mascara and only applied mascara to the bottom.

- She wanted her look to be fun but polished. To keep the look radiant and fresh, I didn't want her lips to be strongly defined. I skipped the lip liner and went straight for a sheer berry pink lipstick from Pink Beauty called Vivi. For a luscious shine, I applied Smashbox's Lip Enhancing Gloss in Spark, also a berry pink shade. Side note: I didn't touch her brows because she doesn't like them to stand out against her blond hair.
14 comments:
What is the name/number of the Quo lashes you used here? They're absolutely gorgeous!
Hey Arianne!
I seriously don't remember the # of the lashes - I threw out the box. I think it's #804 but I'm probably wrong. If you go to Shoppers, you'll probably recognize them right away - they look exactly like MAC's #7's and are slightly separated. :)
OMG! Amazing! Your work is WOW! =) Love your blog!
Hey Regina! Thanks for visiting my blog and for the sweet comments! :)
Wow! Those eyes look amazing, and really bring out the deep brown. I also really love the lip color.
Very nice job, you are an artist.
Christine thanks for participating!
Can I be next?
Thanks Jen! If you lived in the area I would totally want to do a makeup look on you! I'm actually going to get readers in the area to email in if they want a makeover to be featured on the site :) Thanks for stopping by!
i love the pics and seeing how you work! great post!
wow she looks amazing afteeer. i'm loving your nars lipglosses. looks yummy :]
Thanks Yummy411 and Anna! It was fun doing it and can't wait to do more makeup 101's :)
amazing post joy!! loved it!
Wow. This was wonderful. I loved her eyes!
Greetings from Norway.
Thanks Lucky! Means a lot coming from you!!
Greetings to you as well Ildergrein! Thanks for visiting my site and I'm glad you liked the eyes! :)
I love your work, its truly a talent! What are the very best brushes for the strongest sculpting? I saw you used the #109 and #168 are there any ones even better that give even stronger sculpting, what am I looking for in these brushes and makeup products for the strongest sculpting(should the product look more metallic, or soft and flat ect.) Sorry if Ive been bothersome with my questions, I hope you do respond!
God Bless You
Post a Comment